¶ Create a frontend library
A frontend library is a collection of Typescript files without a direct user interface (see Yoeman-Generator).
¶ Goals
We will generate a view plugin as frontend library. At the end of this tutorial you will have created a new library plugin called ‘myplugin’ that will register a simple view within the TDP.
¶ Prerequisites
This tutorial requires you to complete the following steps / tutorials:
¶ Summary
Here is the short form, if you’ve done this before:
# switch to the workspace directory
cd <workspace directory>
# create plugin directory
mkdir myplugin
cd myplugin

# use generator to scaffold a plugin
yo phovea:init-lib

git add -A
git commit -m ‘Initial Commit’

# update the workspace
cd ..
yo phovea:update

# create hello world view
cd myplugin
yo phovea:add-extension
# see below for details

# copy code from the step to ‘src/HelloWorldView.ts’

# add a dependency
yo phovea:install moment

# see code in the corresponding step
Result:

¶ Tutorial
¶ Setting up an empty plugin
The Yeoman Phovea Generator includes a generator script to scaffold a new plugin. In Phovea a plugin is a Git repository which is a coherent piece of software, implementing one or more extensions. A more detailed introduction in the nomenclature used in Phovea/TDP is given in Key Concepts. Phovea supports different plugin types. In this tutorial, we are creating a frontend library plugin that registers a new view to the TDP platform.
First, open a shell (Powershell, Bash, …) and navigate to your workspace location.
cd <workspace directory>
The plugin directory has to exist before a plugin can be created. Using mkdir we create a new empty directory called myplugin for your plugin and switch to it:
mkdir myplugin
cd myplugin
Attention!
A new plugin has to be initialized within an empty directory that should contain the plugin. Otherwise, existing files will be overridden.
Then, we can start the Yeoman generator to set up a library plugin:
yo phovea:init-lib
The generator will ask you a couple of question regarding the characteristics of the plugin.
First, it will ask on which other modules this plugin depends. By default, the phovea_core is selected. If you want to create a TDP plugin, deselect it using space and use the cursor to find tdp_core and select it.
Second, it will ask whether additional libraries should be included. This step can be skipped using enter.
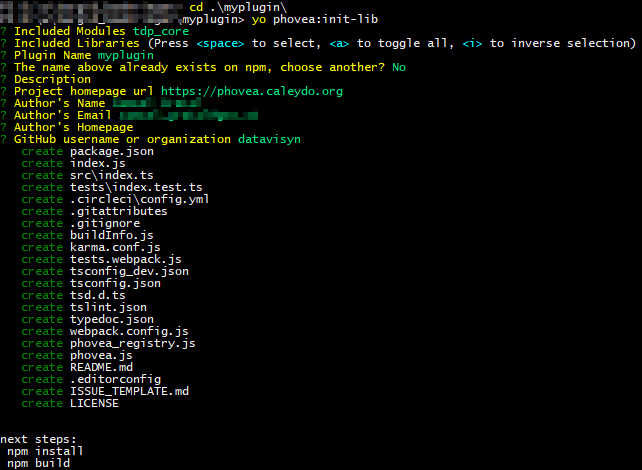
The third promt asks for plugin details such as the name of plugin, description, author, and the Github username or organization used to host this plugin. The Github information is needed to correctly generate repository links. In the end, the generator creates a couple of files and sets up a git repository for it. Your shell should look similar to the following screenshot:
Finally, we can commit the files in the newly created repository by executing:
git add -A
git commit -m ‘Initial Commit’
¶ Updating the workspace
As highlighted in the how to create a workspace tutorial, each time you add a plugin or change a dependency of it, you have to update the workspace using
cd <workspace directory>
yo phovea:update
The generator will ask you to update and replace certain files, agree to override all of them.
¶ Plugin folder structure
A new frontend library plugin has the following structure:
┣━ Root folder (e.g. myplugin)
┃    ┣━ src/
┃       ┣━ index.ts
┃    ┣━ tests/
┃       ┣━ index.test.ts
┃    ┣━ package.json
┃    ┣━ phovea.js
┃    ┣━ README.md
┃    ┣━ …
This listing just includes the important files that need to be modified. Every other file (e.g. webpack.config.js) are automatically generated and already properly configured.
All source code files are located within the src folder. By default a simple index.ts file is generated. Test code is located in the tests folder. Files containing tests use the suffix test.ts to indicate that it is a test file. Tests are executed using Karma and are written using the Jasmine framework. Note that testing is covered in a different tutorial.
‘package.json’ is the main description file; details about this file can be found in the package.json documentation page. It contains a list of all other packages and modules this plugin depends on, see the adding a dependency section. The README.md file contains a short description as well as other information about these plugins. phovea.js is the main metadata file used by phovea to register extensions to the framework.
¶ Creating a “hello world” view
In this step we are creating a new “hello world” view that can take any given Identifier (e.g., a gene symbol) as input. We again can use the Phovea Yeoman generator to scaffold this new extension.
cd myplugin
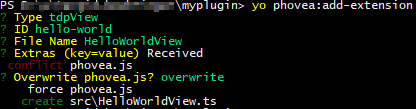
yo phovea:add-extension
It will ask the type of the extension tdpView, a unique id e.g. hello-world, and the filename of the corresponding source code file HelloWorldView. In addition, you can add additional key value pairs that configure this extension. In the editor, enter:
name=Hello World
idtype=.*
selection=some
After closing the editor, the result should look similar to:
The first argument (type) is the extension type entered. In our case we want to register another tdpView. The second argument (ID) is a unique name of the extension such that it can be referred to. The next argument (File Name) is the link to the source code file implementing this extension. The last argument (Extras) contains additional extension type specific configuration options. See IViewPluginDesc for details.
Afterwards, a new file HelloWorldView.ts is created and the content of the phovea.js file should look like this:

The idtype fields refers to the idtype that this view is capable of showing (see also IDTypes). In this example we use the regex .* to suggest that any idtype is valid. selection refers to the minimal amount of items that have to be selected before this view can be shown. Common values are 1 = exactly one item, and some = one or more.
¶ Implementing view
Edit the HelloWorldView.ts and replace the content with:
import {AView} from 'tdp_core/src/views/AView';

export default class HelloWorldView extends AView {

 protected initImpl() {
   super.initImpl();
   return this.build();
 }

 private build() {
   this.node.innerHTML = `<strong>Hello World</strong>`;
   return;
 }
}
This class derives from the AView class and adds an additional custom initialization logic. In this case we call the build function. Using this.node we can access the HTMLElement which is used to represent this view. In this simple example we just show the text Hello World.
¶ Commit current progress
It is good practice to regularly commit your changes. Ideally every commit represents a small semantic unit of work, like bug fixes, or features.
git add -A
git commit -m ‘add HelloWorldView’
¶ Test view
Start the application as usual if it is not already running
cd <workspace directory>
docker-compose up -d
npm start
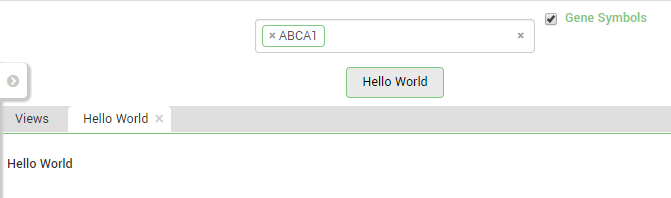
Assuming you have the dashboard application at hand, you can search for any item; then the Hello World view should appear as a possible view. When clicking on the Hello World view the result should look similar to:
¶ Using the input selection
In the previous step we defined that one or more (some) selected items are needed to show this view. In this step we list the currently selected items. Replace the content of HelloWorldView.ts with:
import {AView} from 'tdp_core/src/views/AView';

export default class HelloWorldView extends AView {

 protected initImpl() {
   super.initImpl();
   return this.build();
 }

 protected selectionChanged() {
   super.selectionChanged();
   this.build();
 }

 private build() {
   return this.resolveSelection().then((names) => {
     this.node.innerHTML = `current selection:
     <ul>
       ${names.map((name) => `<li>${name}</li>`).join('')}
     </ul>`;
   });
 }
}
Here, we also rebuild our view when the selection has changed, e.g., when the user has changed the search terms.
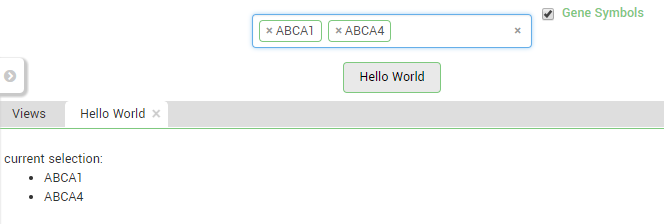
The build() method is slightly more complex. Within TDP, selections are identified by their idType and a range of unique ids. Each entity, such as EGFR, is associated with a unique id. Using unique ids (e.g., 5) instead of the names (e.g.,EGFR) is faster to transfer and cheaper to store. For example the range: 1:100 represents all ids between 1 and 100 in a very compact way. However, within the view we want to restore the original names for the encoded unique ids. The function resolveSelection() takes care of that and returns a Promise, since it may include server side requests. When the names are ready then we render the list as a simple HTML list. As an alternative, we also could use D3 to render the list.
The result should look like:
Additional search terms are automatically added to the view and the view is notified using the selectionChanged method.
Don’t forget to commit your current changes again
git add -A
git commit -m ‘show input selection’
¶ Adding a dependency
Usually you don’t want to reimplement the wheel but use existing libraries. While the Target Discovery Platform and associated plugins already provide you with several view base classes, you might want to add additional libraries.
In this example, we add the Moment library that is great for dealing with dates. In our toy example we use the library to show the current datetime in a formatted way.
One of the advantages of the workspace layout is that all library dependencies of all plugins in the current workspace are downloaded and stored just once in the node_modules directory. However, thus libraries needs to be specified both in the workspace and the plugin using it. The phovea Yeoman generator has a utility for that:
cd myplugin
yo phovea:install moment
This will install the moment library in the workspace and also updates the myplugin package.json file.
Expert knowledge
TypeScript is a typed language and thus needs typing information for JavaScript libraries. While the moment library already has these typings bundled, other libraries don’t. https://microsoft.github.io/TypeSearch/ can be used to look for these typings. However, most of the times, just install along with the library: @types/<libraryname>
We adapt the source accordingly:
import {AView} from 'tdp_core/src/views/AView';
import * as moment from 'moment';

export default class HelloWorldView extends AView {

 protected initImpl() {
   super.initImpl();
   return this.build();
 }

 protected selectionChanged() {
   super.selectionChanged();
   this.build();
 }

 private build() {
   const time = moment().format('MMMM Do YYYY, h:mm:ss a');

   return this.resolveSelection().then((names) => {
     this.node.innerHTML = `current selection:
     <ul>
       ${names.map((name) => `<li>${name}</li>`).join('')}
     </ul>

     current time: ${time}`;
   });
 }
}
We add an additional import in the second line in which we include the moment library in our module. Within the build function, we use the moment module to format the current time and store it in the ‘time’ variable. Afterwards this variable is used when creating the html code.
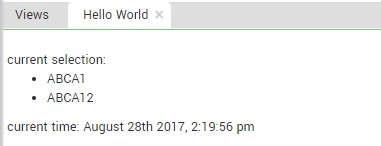
The result should look like:
git add -A
git commit -m ‘add moment library’
¶ Adding a view meta data
TDP applications like dTiles use preview images and descriptions to give the user a hint how the view will look like. The preview image has to be bundled with the view itself and reference in the view declaration.
¶ Taking a preview image
take a usual screenshot of the image an scale/crop it such that the target size is 320x180px. By convention place the image at <pluginame>/src/assets/previews/<viewname>.jpg e.g. in our case myplugin/src/assets/previews/hello_world.jpg
¶ Adding meta data
to include the preview image in the view description, edit the phovea.js file in myplugin/phovea.js. Navigate to your registered tdpView extension point and add the additional preview and description lines:
registry.push('tdpView', 'hello-world', function() { return import('./src/HelloWorldView'); }, {
  'name': 'Hello World',
  'idtype': '.*',
  'selection': 'some',
  'description': 'My first TDP View Plugin',
  'preview': function() { return import('./src/assets/previews/hello_world.jpg') }
 });
The preview image is defined as an callback function that will lazy import the generated hello_world.jpg preview image.
In application like TDP this new meta data is used to provide the user with more information about the view as shown in the following screenshot:

¶ Conclusion
Lessons learned:
- How to set up a new frontend library plugin.
- How to create and register a new view in the Target Discovery Platform.
- How to render the input selection and react to changes of it within the view.
- How to add and use an external JavaScript library.
- How to add view meta data.